


 Hello Craftaholics! Today its me, Jessica back with a little stool makeover.

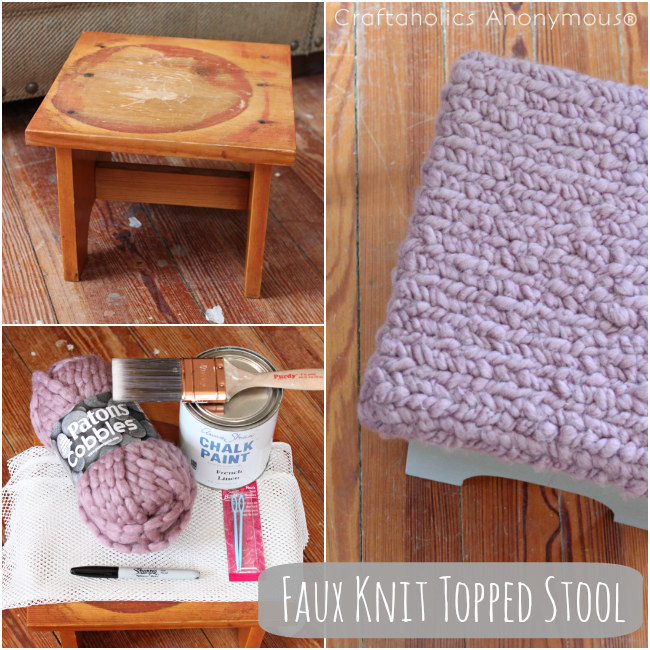
My son was given this little stool by his great grandmother. I believe it had been used as a plant stand and the top was not only stained but actually had a pretty significant indention as well as scratches and gouges. Because of that it was tucked away so I decided instead of trying to sand it down that I would make a cover for the top of the stool.
I’m a sucker for texture and all types of stitching. I love knit, crochet, crewel, quilted, and cross stitch patterns. I’ve even painted a dresser with a cross stitch motif!
Since I don’t knit but wanted a knit look I started thinking of ways to create the look I desired. A simple answer was stitching a V-shaped pattern onto mesh netting!
Faux Knit Topped Stool
Materials Needed:
- wood stool
- chunky yarn (I used a cobbled wool look yarn.)
- plastic yarn needle
- mesh netting
- scissors
- Sharpie
- covered work surface
- paint/paintbrush (if desired)
- heavy duty stapler and staples

Directions:
1. On a covered work surface layer top of stool over mesh netting. Leaving several inches of extra space all around the top of the stool, trace the top of your stool.

2. Cut length of yarn, tie knot in one end and lace opposite end through yarn needle.
3. Starting well outside of Sharpie lines (Trust me! As you stitch your square will shrink. I had to go back and add some rows of stitches on 2 sides after I thought I was done!!) pull yarn up from bottom of mesh.
4. I counted down the diagonal for a total of 5 holes (1- yarn up, 2/3/4- skip, 5- yarn down) per stitch. If you desire a longer stitch skip more holes before you pull your yarn back through to the bottom.
5. To start next stitch pull the yarn back up in the hole directly below.

6. Continue following the same pattern until you are well outside the Sharpie border at the end of the row.
7. Follow the same pattern (on the opposite diagonal) working back towards the beginning having the stitches form a V.

8. Continue this back and forth diagonal stitch pattern, tying off and starting a new length of yarn as needed until the necessary amount of mesh is covered.

9. Once the stitched mesh is large enough to cover the top and edge of the stool, lay mesh right (yarn) side down and lay top of stool down. Line up and staple one side.
10. Pull taught and staple down opposite side.
11. Fold over and staple 4 corners and then continue by stapling down remaining 2 sides.

12. Cut off excess netting and staple down any mesh that may be loose or hanging where it is visible.

Tada! A knit look stool!

As of last Friday we own and will be redoing a home built in 1910. This little stool will be making it into our master bedroom redo. That is- when we get to working on the upstairs!

So I’m curious!! Are you a lover of stitched textures like me? Do you think you could handle a little faux knitting?!! It takes a little time but I promise it’s not difficult at all.

Jessica D
Latest posts by Jessica D (see all)
- DIY Wood Spool Towel Bar - Jan 09 2015
- Cedar Ring Ornaments - Dec 10 2014
- How to Gilding with Three Metallic Mediums - Nov 03 2014
That is super cute but a lot of work! I’d probably only resort to using mesh and stitching if I didn’t actually know how to knit or crochet. I’d almost prefer to slip stitch a cover with a large crochet hook to get the same look without the mesh base. I’d barely consider knitting one in stockinette with a cute cable through the middle of it just for fun, then pad it a little bit with foam or poly batting, cover with cotton fabric, and attach the crocheted or knitted cover. Great idea!
I think that is a great idea! I actually look knit and could do that then recover a little stool with it. Thanks for inspiring me today! :-)