


Hey there! It’s Alexis from Persia Lou, and today I have a tutorial for a cute pillow perfect for Valentine’s Day (or any day, really!). This pillow has a great graphic punch, but – good news! – a simple envelope pillow design and heat transfer make it simple enough to whip up in less than an hour. Easy Peasy!
DIY Valentine’s Day Pillow : Forever Ever Pillow Tutorial
by Alexis
 Materials:
- 1 yard of fabric
- Pillow form
- Heat transfer vinyl – I used white and gold glitter
- Silhouette cutting machine
- Forever Ever heart svg cut file
- Sewing machine and thread
How to Make Valentine’s Day Pillow
Begin by cutting your fabric. You will need three pieces – one square for the pillow front and two rectangles for the back. My pillow form was 19″ so my pieces were cut to 20″ x 20″ and 20″ x 16″. For a 16″ pillow form, you will need a 17″ x 17″ square and two 17″ x 13″ rectangles.

Next we will cut, weed, and apply the vinyl to the pillow front. Start by downloading my forever ever heart design and opening it in Silhouette Studio. The file is already mirrored and ready to be cut out of heat transfer vinyl. If you are cutting the design all out of one color, just go ahead and cut the design and weed out the negative space.
If you want to cut the design out of two colors like I did on my pillow, you will need to do two separate cuts. Click on the sections you do NOT want to cut and then select “No Cut” before cutting. Then, go back and switch it to the opposite before cutting the next piece.


Grab your square pillow front, and let’s adhere that vinyl! To find the center of the square, fold it in half one way and then the other. Give the center fold a quick finger press, and unfold. Center the heart shape over the center mark, cover with a scrap piece of fabric and firmly press for 45-60 seconds.

Remove the plastic, and you will see your cute heart shape! Now, line the lettering up, so it fits into the heart, and repeat the pressing process. Our pillow front is all done!
To prepare the back panels, press one of the long edges of each piece up about 3/8″ and then again about 3/8.”
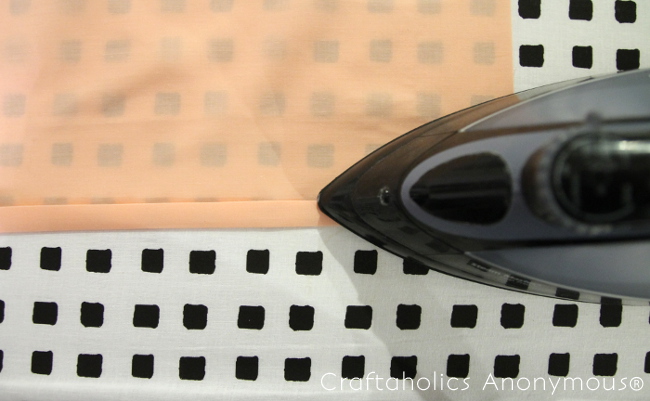
Stitch over the top of the pieces you pressed to create the hems of on the pillow back. Now your pieces are nearly ready to sew together.

Layer the back rectangles so they overlap in the middle and form a 20″ x 20″ square. Pin the pieces together so they remain in that shape.

Finally, pin the pillow front to the back with right sides facing each other. Sew around the entire outer edge of your square leaving about a 1/2″ seam allowance. Flip your pillow cover inside out, and stuff in the pillow form.

And that’s it! Enjoy your cute new pillow!

I hope you enjoy this romantic Forever Ever DIY Valentine’s Day pillow!
MORE Valentine’s Day Crafts:
 49 Valentine’s Day Mason Jar Crafts || Loads of creative gifts and crafts for the loved ones in your life!

Printable Lunchbox Valentine’s Day Jokes & Coupons || Super cute way to help kids feel loved!
TODAY January 5, 2015 is the last day to apply for the Craftaholics Anonymous® 2015 Creative Team!
Alexis
Latest posts by Alexis (see all)
- DIY Valentine’s Day Pillow with Free Cut File - Jan 05 2015
- Free Printable 3D Christmas Trees - Dec 09 2014
- DIY Watercolor Place Cards - Nov 05 2014