


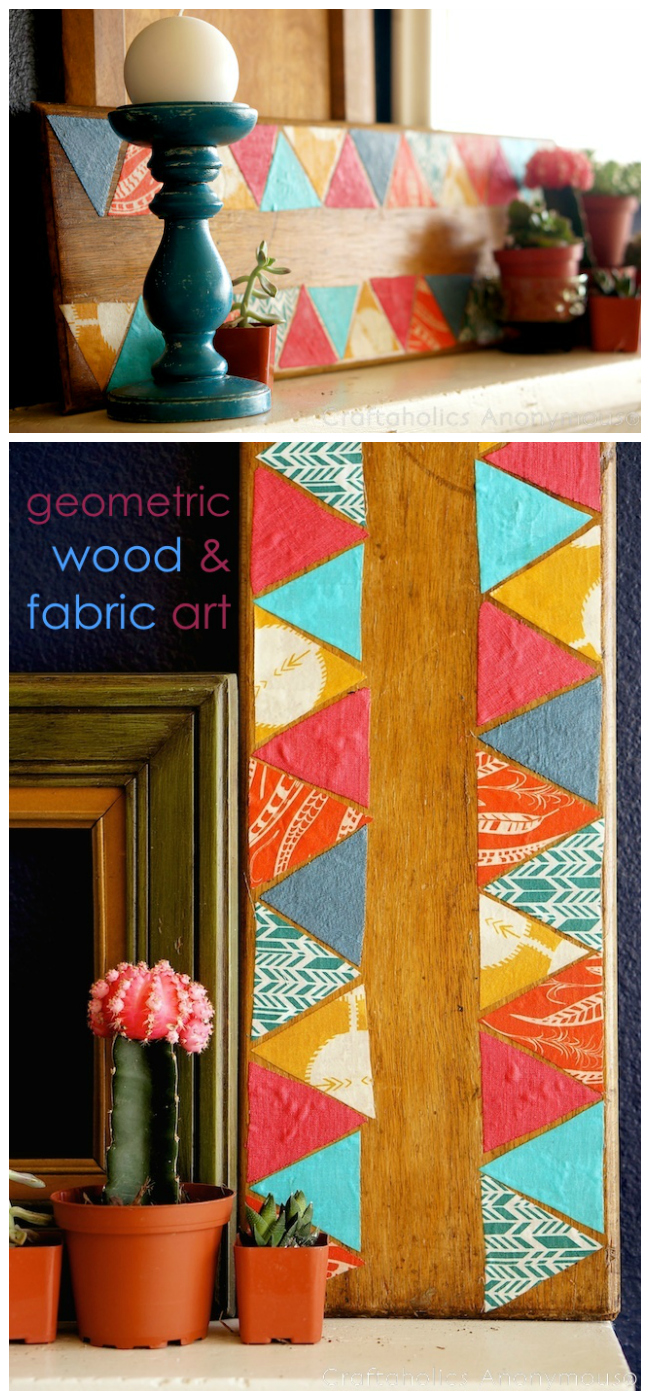
Spring is so much fun for two reasons: 1) Spring cleaning (well, that’s not really fun, but it does feel good to take out all the old stuff), and 2) Spring decorating! I love taking the winter decorations off my mantel and remaking the space for the brighter, warmer months ahead. Here is a fun little geometric art on reclaimed wood project I did for this spring. It turned out stunning!
Geometric Art on Reclaimed Wood
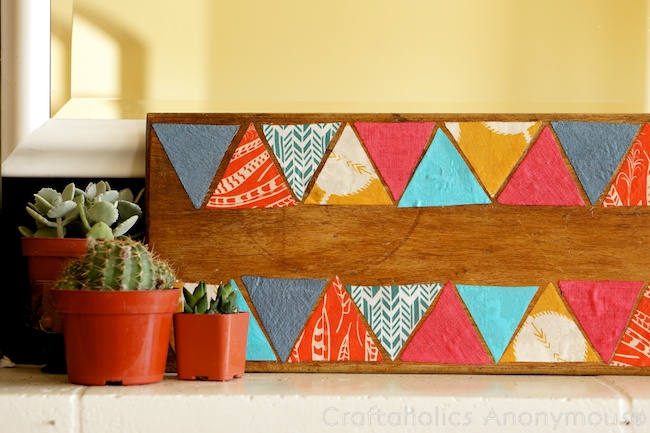
This Spring, I’m still all about triangles (no surprise) and found a fun way to repurpose old wood AND make use of the fabric scraps cluttering up my sewing room. This geometric wood and fabric art piece is the perfect Spring craft to brighten up a focal point in your home. The directions are simple and involve Mod Podge, one of my favorite things. Also–I should stop being surprised by this–I can’t believe how much less time it takes to modpodge fabric to a surface rather than sewing it together! MIND BLOWN.
Do you have a Craft Question? Post it on our Facebook Page and get answers!

MATERIALS NEEDED:
- A reclaimed piece of wood. {I used an old cabinet door purchased from a local Habitat for Humanity for $2.}
- Mod Podge and a brush. {I used matte, but you can also used the original glossy for a slightly different finish.}
- Fabric scraps cut into triangles. Try to cut all the triangles the same size. The number and size will depend on your piece of wood.
Geometric Art on Reclaimed Wood tutorial
Set your wood on a flat surface and lay out your supplies.

 Arrange the triangles on the wood in your desired pattern. Make sure the triangles are spaced correctly before you start attaching them to the surface of the wood, because once they’re stuck there is no going back.

 Start attaching the fabric scraps one by one by brushing ModPodge on the wood and then placing a triangle on it. You will have a brief moment to adjust the placement of the triangle before the ModPodge starts to dry. Don’t be too worried about perfection. I like the “rough” and handmade look of slightly wonky triangles.

Continue adhering the triangles to the wood until each one is in place. Allow the ModPodge to dry for about 15-30 minutes, or until the triangles are dry to the touch. Finally, brush a coat of ModPodge over the entire surface of the wood to seal the triangles. This will darken the fabric slightly, but I still liked the final look of my project and I’m sure you will, too.

Tada, you’re done!

 Have to have some succulents!

Now go enjoy your new Spring space! Have some friends over for a BBQ or movie night and enjoy the warm weather as it starts to roll in. I probably shouldn’t tell you this, but here in Southern California we’ve actually been celebrating Spring for months now! Hehe, sorry to rub it in.

 Looking for MORE Modern Craft Ideas, here ya go!
Do you like Craft Inspiration? Follow us on Pinterest! We share lots of fab creative finds from around the web!
Caila
Latest posts by Caila (see all)
- Vintage Pillowcase Skirt tutorial - Jun 02 2014
- Geometric Art on Reclaimed Wood - Apr 29 2014
- How to Sew Doll Pillows Tutorial - Mar 27 2014
Wow, what a great idea! Ordered some mod podge…so I know how my weekend is going to be spent. :)
I’m glad you like it Yamini! It’s a fun way to spend an afternoon. :)
Pingback: Geometric Art on Reclaimed Wood