


Fall Wreath
 Happy friday, crafters! Hope you are ready for a nice long holiday weekend. We sure are!! We’re headed to a beach house in the outer banks for a week. i’m so excited!!! ANYWAYS, here’s how I made this gorgeous fall wreath using burlap and a few other supplies! This wreath is easy to make and the flowers can easily be changed out for different embellishments for future holidays. You can make it an interchangeable wreath to be reused for other holidays! Saving you time AND money!
How to Make a Fall Wreath
SUPPLIES
- wreath form
- 1/3 yard burlap to cover the wreath
- scraps of 3 different colors of burlap {i get mine at Joann’s}
- 3 alligator clips
- scissors
- hot glue
- buttons {i used the half dome metal craft buttons found in the notions section}
- scraps of fabric
How to Make an Interchangeable Burlap Wreath….
 1. Cut your burlap into 2.5″ inch strips. {check out this great tutorial on the secret to cutting burlap straight}
 2. Take one burlap strip and hot glue one end to the wreath form.
{note: depending on your color of burlap, you may need to paint your wreath form. my wreath form is black because i thought that would be less noticeable than white behind tan burlap. the black looks like a shadow and you can’t even see it in the final product}
 3. Wrap burlap around the wreath form, overlapping the previous burlap, and glue every couple wraps. When you get to the end of the strip, hot glue the end to the wreath form and then start the next strip over the end of the previous and continue wrapping.
 4. This is what your wreath should look like all covered in burlap.
 5. Cut three 1″ strip of burlap to wrap around your wreath form and is slightly loose.
 6. Place a thin line of hot glue along one end of each strip and press the other end of the small strip over. Make sure that the strip doesn’t get attached to the burlap that is wrapped around the wreath form. You want this strip to be unattached so that you can move it up and down the wreath. Glue on the remaining 2 small strips of burlap the same way.
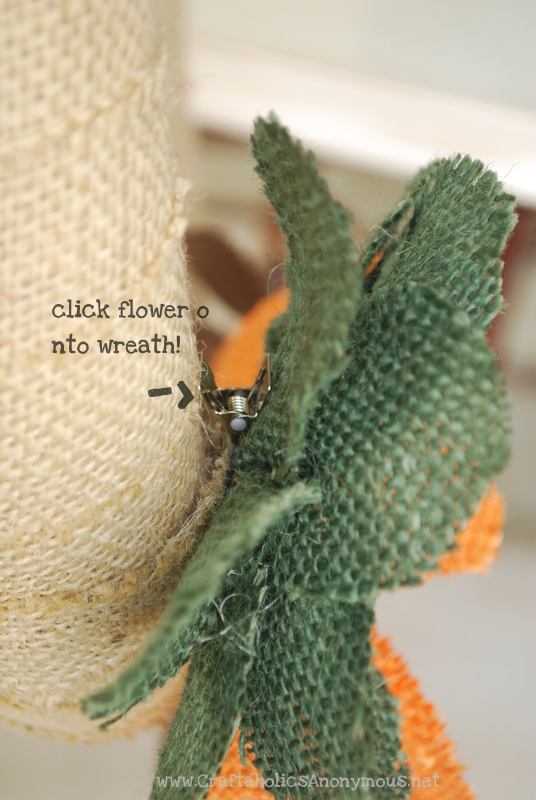
 7. This is what your wreath should look like with the 3 slightly lose small strips in place. See how you can slip the alligator clips under the strips? Now you’ll add your flowers to those clips…..and then clip the flowers in place! The smaller strips blend in with the wreath, but make it easy to change up your wreath for different seasons or holidays.
{sorry for the blurry pic.}
How to make Burlap Flowers….
 Now for these perky little flowers that make this fall wreath fabulous!
 8. make templates like these shown above for your flower petals. *I tried to scan this in so that I could share it with you, but my scanner broke. UGH!! i’m so sorry! I’ll keep trying though*
 9. Each burlap flower will need 3 petals from 2 sizes. {6 total petal pieces=1 flower as shown above} for the green and brown flowers on my wreath, I used the small and medium sized petals and for the orange flower {center flower} I used medium and large petals.
TIP: you want your burlap to be completely flat for best affect for the flowers. if your burlap has creases or is wrinkled, use a hot iron to flatten it. {just be careful not to leave the iron in one spot for very long}
 10. Using your glue gun, fold over both sides at the center of each petal piece and glue in place. this makes the petals perk up.
 11. Hot glue the 3 petal pieces of the same size together as shown. making two flowers with 6 petals. Then stack them to make a flower with 12 petals and glue in place.
 12. Cover your buttons with fabric. With the craft button that i used, it comes with a little gadget that you layer the fabric, then the metal button, and then it helps you squish all the fabric around and push the back in place to hold everything together.
But you could very easily hot glue fabric around an actual button.
 13. Hot glue your fabric covered buttons to the centers of each flower.
 14. Hot glue an alligator clip to the back of each flower. To do that, place a thin line of glue on the back of the flower, open the alligator clip and place one prong of the clip in the glue. hold the clip open until the glue has cooled and set. {about 10 seconds or so, depending on the heat of your glue gun}

15. Clip your burlap flowers to the small loose strips on your wreath. and you’re done!
*the beauty of this wreath’s set up, is you can adjust the strips to tweek the placement of your flowers! oh and that you can change out the flowers for something else for the next holiday. love a transitional wreath! and its different from other transitional wreaths with velcro, because you can move it around to adjust for different types of embellishments. *

Hope you like my fall wreath! I absolutely love it!
happy crafting,
linda
psst…. don’t miss a craft! Sign up for Craftaholics Anonymous RSS feed!

Latest posts by Linda (see all)
- Powder Room Makeover - Mar 25 2019
- Raspberry Sweet Rolls Recipe - Mar 12 2019
- Farmhouse Spring Wreath - Feb 19 2019
i love this im going to have to try this
thanks, heather!
happy crafting,
Linda
Pingback: fall wreath idea using burlap for an autumn look | Craftaholics Anonymous
oh I can’t wait to get started on this! seriously have to finish yesterday’s to do list before I start anything else though
This is GORGEOUS and so simple!! I may have to take my football wreath down to make this!! ;-)
Great tutorial again! I love the versatility of it.
Thanks, Brittany!! I appreciated the shoutout on FB this morning too!
happy crafting,
Linda
so pretty, I love that the flowers are inter-changeable! I also love how quickly this can be put together! My kind of craft! Thanks for sharing this cute idea!
Thanks, Megan!! Glad you liked it! thanks for stopping by and saying hi!
happy crafting,
Linda
I love this!!! I see a trip to JoAnn’s in the near future.
This is a fun fall project! Thanks for sharing it!
thanks for stopping by, della!
happy crafting,
Linda
Beautiful! Burlap seems to hate me but I am determined to win it over!
i hear ya. burlap isn’t the most pleasant to work with, but the results are so worth the mess!! thanks for stopping by, Carol!
happy crafting,
Linda
Love, love, love it!!
so fall, love it :) Where do you get alligator clips from???
thanks, Mindy! i usually get my alligator clips at Sally’s beauty supply or else TheRibbonRetreat.com.
happy crafting,
Linda
I was looking at the website you listed. Which size clip do you suggest?
Thank you for the tutorial. I am going down and hunt up some pieces of burlap in my stach of material and do one up now. Nice to have everyting I need for a project already.
Karan
isn’t it great when you have everything on hand to make a craft? love that! thanks for stopping by!
happy crafting,
Linda
So very cute – what size wreath form did you use – 12 inches? – it appears to be larger than that.
Love it! Will be making a trip to Joanns soon! Looking forward to attempting this! Thanks for the great tutorials!
any time, karis! thanks for stopping by!
happy crafting,
Linda
Love it! I can’t wait to make one!!!
Thanks, Libby!
happy crafting,
Linda
Oh Linda, it’s beautiful! Great job :)
thank you, jen!! :) thanks for stopping by!
happy crafting,
Linda
LOVE! I am so ready to start decorating my porch for fall! Great job!
Thanks, Brook! thanks for stopping by!
happy crafting,
Linda
I’ve never really liked the burlap look, but you may just have won me over with this wreath. Maybe it’s the combination of the burlap with the fall colors, but I just love this!
awesome, dianne! welcome to the wonderful {and very messy!} world of burlap! haha
happy crafting,
Linda
Thanks Linda! I saw your wreath on here yesterday and fell in love with it! So I went to buy the supplies hoping that I could wing it. (I’m a super beginner crafter). I got on just now to use your picture of your wreath as a guide and I was so EXCITED to see the tutorial! Thanks so much! Can’t wait to see how it turns out. :)
Wow, I am so glad I subscribe to your blog! I have a five year old who loves to help me quilt and sew and craft, but many times the project is just too dangerous/complicated for her to do much. This is perfect for kids to help with…thank you! I think we’ll even make wreaths for her teachers. She is going to love this, and it gives me an excuse to buy a button covering tool:)
awesome! these wreaths are a great project for kids. and love the idea to use them for teacher gifts!!
happy crafting,
Linda
I love this! This is the perfect fall wreath for my door :)
thanks, julie! thanks for stopping by! :)
happy crafting,
Linda
Great idea!! My goal is to make 1 fall thing in between my kid’s crazy schedules! bellesbazaar-heather.blogspot.com
Awesome!!
happy crafting!
Linda
love love love this! I can’t wait to make one:) Thanks for the great tutorial!
thanks, tori! i’d love to see your version! :)
happy crafting,
Linda
I am knew to your blog and love it! What a cute wreath you made I posted a link from my blog to yours advertising your tutorial, hope you don’t mind:)
thanks amy!! :) you rock!
Linda
So cute! Thank you so much for sharing!
This tutorial was perfect! I made my own burlap wreath today and I couldn’t be happier! (Or itchier…) I used a white wreath form though, which worked out well, and I did both fall and winter flowers. My idea was that after Thanksgiving I could swap them out! I also used wooden buttons instead of the cloth ones because I didn’t have any cute fabric lying around but I really like how it turned out! I took a picture but I can’t figure out how to put in this comment box. ^_^
-Sarah
awesome, Sarah!! i’m happy you used my tutorial! :) thanks for stopping by craftaholics anonymous!
happy crafting,
Linda
Pingback: turkey thanksgiving craft idea | Craftaholics Anonymous
So pretty Linda!!
LOVE THIS, linda. so stinkin cute!! (:
awesome interchangeable option. i’ll most likely be copying ;) lol!
xoxo, kelli
thanks, kelli! can’t wait to see yours! be sure to send me a link so i can help you show it off ;o)
happy crafting,
Linda
Great post! can’t wait to try it! thanks for sharing!
This is beautiful! So simple and I think even *I* could make it!
yes you can, krista!! super easy! thanks for stopping by!
happy crafting,
linda
Hi Linda, LOVE your wreath and just featured it in my Autumn Wreath Roundup. Here’s the link: http://www.sasinteriors.net/2011/09/15-inspiring-autumn-wreaths/. I really like your idea on how to make the flowers interchangeable.
xo Jenna, SAS Interiors
I am in the middle of making this wreath, and I am delighted with how it is turning out. So easy! But, I’m wondering..where did you get your craft buttons and tool? I looked at Hobby Lobby and couldn’t find anything, but maybe I was looking in the wrong place. Any feedback would be great!
yay! i’m so happy you made one, Mary!! i got the nifty little fabric button tool in the notions section at Joann’s. Its by the D-rings. I think the brand was Dritz, but I may be wrong on that.
Hope that helps!!
happy crafting,
linda
Beautiful wreath Linda. Pinned and stumbled!
Hi!! I absolutely LOVE this wreath!! I am so making it too… probably going to JoAnn’s TOMORROW!! how many yards total of the burlap used to cover the wreath did you use?? Thanks!!
Alex
Hi Alex,
Awesome!! It’s super easy! you’ll need 1.25 yards of burlap. if you have any more questions, just let me know!
happy crafting,
linda
I was wondering what you used to hang the wreath on your door with??
I wondering how you hung the wreath also. My front door is not wood and has not wreath hanger on it. This is actually my first ever wreath so I have no idea how they are normally hung. Mine is completed and I’m excited to get it on my front door!
congrats andrea! way to go on making your first wreath!! wahoo! honestly, i just hammer in a long nail in my front door. i’ve never had a problem with it!
thanks for stopping by! i’d love to see a pic of your wreath! feel free to post it on my FB page and show it off to everyone :)
happy crafting,
linda
I just use a long nail to hang my wreaths. I’ve never had a problem with it.
thanks!
Linda
This is my first time here and I’m hooked! You are my new Martha :) This was just what I was looking for.
aw thanks, marisa! that’s like the biggest compliment ever! haha glad you found me! i hope you’ll stop by again soon.
happy crafting,
linda
Linda, I love this!! Seriously, so darling! Great tut! xoxo
Pingback: craft room organization | Craftaholics Anonymous
Pingback: Ring Around the Rosie « Little House. Big Heart.
I love this tutorial! and I totally want to make one of my own! Great job and great tutorial!
thanks, alyssa! i would love to see your wreath when you’re done :)
happy crafting,
linda
Ok, I have my wreath covered. A lot of my burlap is fraying… will it eventually stop?
And any bids on getting the template of the flower petals?
Thank you so much!!!! LOVE it and glad I am attempting it (my first wreath)
Hi Jenn,
Congrats on making your very first wreath!! yay! you are no longer a wreath virgin. haha. Unfortunately, no your burlap will always fray a little bit. Here is a trick that will help minimize how much your burlap frays if you cut it this way: https://www.craftaholicsanonymous.net/2010/01/secret-to-cutting-burlap-straight-and.html hope that helps! i’d love to see how it turns out! feel free to post a pic on my FB wall to show it off :)
happy crafting,
linda
Pingback: how to make a QR code for your website | Craftaholics Anonymous
I did it! After a few burned fingertips and a ton of burlap shreds on my lap, my wreath is complete and beautiful! I’ll try to take a picture and upload to your FB page tomorrow. :) Thanks for this tutorial!
way to go, Nikki! i’m so proud of you! :)
happy crafting,
linda
Pingback: burlap halloween wreath idea | Craftaholics Anonymous
Any luck with the flower petal template?
I LOVE your wreath and have bought all the items to make it…but I was wanting to know how big is your wreath?!
Hi Sara,
Sorry for the slow response, but it is a 15″ wreath form.
happy crafting!
linda
Pingback: winter wreath tutorial | Craftaholics Anonymous™
My JoAnn’s only carries a few boring colors of burlap. Do you have a trusted website for purchasing a variety? OnlineFabricStore.com has several fun shades, but I am finding many negative reviews on them…
Hi Emily,
Have you tried Joann’s online store? I usually get my burlap at my local Joanns, but I know their online shop carries all the colors of burlap. Hope that helps!
happy crafting,
linda
Thanks, Linda. I have looked at Joanns.com several times and they only have the same colors in my local store (black, brown, sage, white, …), no orange like your fall wreath! I am hoping they will stock some this fall.
Pingback: How to make a Valentine Wreath | Craftaholics Anonymous™
Pingback: St. Patty's day wreath | Craftaholics Anonymous™